Creating the train pic in the demo Toys by Gods


Back in '99 Gods released a demo called Toys. That demo won the competition at the Trip '99 party. At that time a lot of people in the scene expressed their concern about the fact that this demo used a commercial mp3 tune. This article is not about the music, or about the quality of the cinematics in this cartoonish demo. As this is the GFXZone, the article is about the graphics. And to be more exact, about the train picture that XBarr created for this demo. XBarr has written an explanation about how he created the image. The article is available on his homepage, and he gave us permission to use his article on the GFXZone. So if you are interested to learn about the approach other people take when creating their graphics, this is a good article for you to read. Enjoy!


I used Photoshop 5.0, a Wacom PenPartner graphic tablet and a flatbed a4 scanner plus the nearest pen to me.

Step 1: Drawing & composition

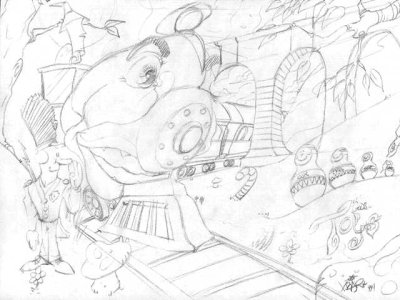
Okay, the very first good thing to do when trying to make a fullscreen picture is in my opinion to find a thema for it! I must admit that for this picture thema was not hard to find has it was destined to be included in a 'movie-like' demo. And since I really began it about 3 days before the deadline, I had many element of the demo to base the picture on. Having stuff like a train, toys, candy and a feeling of happiness for components, the next hard part was to combinate them into a well-organized picture. That is, finding a good composition where no element would be un-welcomed where I'd put it...

The main idea was to focus on the train, the rest of the composition is rather standard with some tricks wich always give a good depth to a picture (like having an element in the very foreground as the mushroom in the down-right corner). There is no improving point of view nor is there any perspective effect that would make the pic wilder.

The purpose was to fit in the gOds' Toys style so I chose a classic point of view with a regular fov (field of vision, the strenght of perspective... just try Lightwave [;). If I was asked why I'm happy with the composition here (because I am (;) I would say that you do not have the impression of a closed world, it feels like you could take a ride in the picture... That's what I like...
     Step 1 - the first sketch

Step 2a - filling the blanks

     Step 2: Filling... garg...

Wooh... Here comes the longest part for me. Filling all these white areas. As you can see I started with the train. because it is the main entity in the compo so I was sure not to finish it in a hurry! That would have been dramatic! ):

The technique I used to colorize those areas was to fill them with average colors then shading it using the 'darken/lighten' tool of Photoshop. There is nothing more to say here except for one thing I learned with time (and that I didn't know when I created this image. ALWAYS KEEP YOUR LAYERS!

It is the best way to fastly colorize objects in your pic. For instance take one layer for the grass, then a new layer on the top of it on wich you draw a mushroom. Then by preserving transparency of the mushroom layer you only work on your mushroom!

As an extend when you switch back to the grass layer you simply use the darken tool to create the object's shadow while never darkening the object itself. LAYER RULEZ!

Step 2b - filling the blanks      Step 2c - filling the blanks

Final words

Well, these informations might not be useful to you, but people have frequently asked me: 'How to do this kind of pic?' So I hope this will bring a beginning of answer.

Ofcourse, the only true advise that would need to be given is: practice, experiment, do, undo, redo. But everybody knows that (; It's only a matter of doing it!

Last thing here the PSD version of the final step of this picture. Unfortunately it only features a few layers since I used to merge them at any point of the conception.

Woohoo PSD are heavy! Download (2687KB)
     Final step - endresult


The information in this is a direct conversion from the article found on the homepage of the creator of this article: XBarr. He originally wrote the article and it has been reprinted on the GFXZone with his kind permission. XBarr has a homepage on xbarr.planet-d.net and you can send him a mail here. Also, the full Toys demo is available for your viewing pleasure at Pouët.


   news    galleries    articles    database    links