Ok,
what we have here are major steps in completing the face. I decided I could make
a middle aged lady, but still beautiful, just to move from those
sterotype-cool-looking-babe. Plus, it goes cool with that rusted steel and
colours.
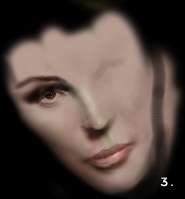
3. The
face is shaping pretty nice now and we can move onto details of the eye. The
most important rule is that the white part of the eye is NOT white. Eyes are
always in the shadow of the forehead bones and brows. Think of them as spheres
and shade in that manner. Again keep in mind the light source. In this picture
shadows are strong and cover more than a half of the eye so you can't see the
upper eyelid. But I did draw it and if you would brighten the picture you
would see its shape. The coloured part of the eye (dunno the english word for
it) is always the most entertaing part of the job. But there are some rules
which we should stick to. Don't draw the outer circle then the colour circle
and then the inner black circle. Make the shape of it in the colour of the eye
you want and add the details with dodge/burn. There is a little trick of how
to do eye real. The eye is a sphere with a hole in it and covered with a layer
of "glass". Glass refracts the light rays so you have to do the same
thing here. Draw the highlight of the colour part on the oposite side from
where the light comes from + draw the shadows in circular way. Add some
eyelashes and shadows on the root of the nose and voila. And please don’t
forget those little white thingies in the corner of the eyes that 90% of ppl
forget. KEEP IN MIND THE LIGHT SOURCE =).
OK, so I finally pushed myself to make a decent tutorial on how I work and how I use colours and tools in PhotoShop. First of all, I'll introduce myself. My name is Petar
"der Punkt" Ivanchek, 21 y.o. from Croatia. I study at Croatian Academy of Fine Arts and have been drawing on computer for 9 years now, 6 in Photoshop. Ofcourse, even I when started, used filters, lens flares, photos. But not any more since I now realize that filters only
f.**k up the realism and soul of the picture. I work with mouse (can't afford a decent artpad) so all of you people who curse those lucky ones who have it don't despare. We are gonna show those sissies that we worth something too =))). Ofcourse I don't scan, copy others work or work looking at some photo. Just plain mouse and PhotoShop.
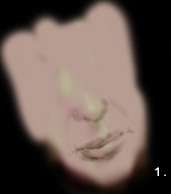
1. The
first step isn't really a major one its just laying down broads of colour and
sketching the position of eyes, lips and nose. Spend alot of time here since
this is really a base of every detail. Consult a photo if you need, and put
the bones on their correct spot. You can use burn/dodge for it. Don't worry if
it looks awful like it looks on pic 1. just try to make the relations between
eyes, nose and lips PERFECTLY correct. One thing you shouldn’t forget is
opening a new layer and leaving the background in colour you will use mostly
(on the background ofcourse). USE ALOT OF LAYERS. Did it? OK. Lets move
onto...
2. Start adding shadows and highlights KEEPING in mind from where does the light come from.
Now, I should say something. Don't use dodge/burn to shade your stuff. Its absolutely wrong. Try using airbrush set to 10% MULTIPLY with a, lets say 30% gray for shadows, and for highlights airb. set to OVERLAY with somekinda pale colour (don't use white). Don't think I didn't fell for the cool use of dodge and burn. Hell I worked like that till recently. You can see how its wrong by putting 100% orange next to 100% green. Then try to make that shape oval by burning them. You'll see how orange turns into red and green gets darker. Now thats how the shadow DOESN'T work. Try the same with MULTIPLY.
The point in laying a few colours in step 1. is to make appearance of the skin in this case more interesting and realistic. Ofcourse you can, and I STRONGLY recommend that you do, use that technique on metal, wood etc. Its just somekinda painterly approach. Now where you pointed the nose, lips, etc. start adding shadows and shape the part in mind as you wish. Try shaping lets say nose with shadows. We are gonna cheat here and we'll use smudge tool, 3-5 pixels wide rough (don't use soft).
Why I say cheat about it is the fact that we are not alowed to smudge in school we shape everything with a line or colour =).
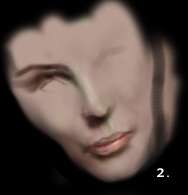
Don't
draw lips with one colour only. Again use OVERLAY+MULTIPLY (set on 5-10) with
some lighter shades of purple, pink and red. Now, the eyes are very tricky. They
shape a face. If you make them small you'll make a piggy-mistress, and if you do
them too big you’ll get a lady-had-a-lot-of-coffe- last-night kind of
expression. Look yourself in the mirror and see how the sizes of the lips and
eyes relate to each other. So, when you laid down the shadows you can use
dodge/burn for fine adjustments and contrasts.
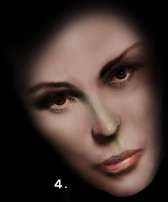
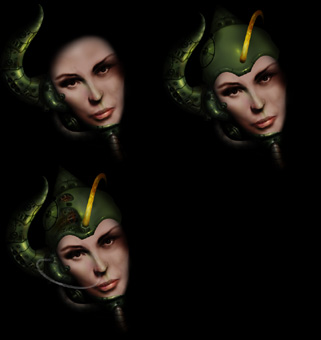
4. So,
the last step in completing the face is, as you can all see, adding the other
eye and fine tuning. I followed the same procedure for the other eye and worked
some more on the lips shaping them so they don’t look like our gal standed on
the wind for 2 hours. Obviously you can see some minor changes on the nose, chin
etc. OK, everything is done, and I spent some whole 3 minutes adding and
adjusting highlights. You know, there is a really interesting thing happening to
me when I do something. I ALWAYS test how the picture looks when brightened,
darkened, inverted etc. I do that bcoz ppl have different monitor settings and
if you make a picture dark on your setting someone else couldn’t see shit
unless he would brighten its monitor. (That thing happened to me on one
competition. Picture was so dark that they couldn’t see a thing on it, just a
few highlights and I got disqualified. Later on I asked judges to brighten the
monitor, and what happened? I could get 1st prize if I told them before. DAMN
=). So, when I test my pictures I ALWAYS like what CURVE filter does it on AUTO
setting. I don’t use it every time, I rather do it manually. And, I always end
up with a picture that has stronger contrast. OK, the face is done... Oh, who
can say what I did wrong on that face? Go on, boys and girls find it.
5. The helmet, and all the other things are done JUST the same as the face. Again, broads of colour, multiply, overlay. Some dodge/burn/saturate. Oh now we come to that part I skipped on purpouse. When I work on a face, it has to look alive and colourfull and it somehow needs to move, so I work just with brushes and move the strokes freely. But, when I work on something thats technical, precise etc etc like that helmet, I use...... what? PAAAAAAATHS!!!! Thats right, paths. Paths are one GREAAAAAT thingie Photoshop has (in some recent tutorials I have seen that some guy uses Freehand to do vectors). Thats the same thing I am doing with Paths but, I think I have much more freedom with it. When you make a shape with paths, you can turn it into selection, outline it, again change it if you don’t like its shape, and most of all ----- ITS ALWAYS THERE. You just have to doubleclick on #work path# and it turns into #path1# or whatever you name it. So the helmet was done in that manner as everything else except the face. Ok, we just need to add the tube stickin outta the helmet used for hormonal and oxygen feeding of the brain, add the shadows and we are DONE. I don’t like the tube that much, doesn’t look very realistic, but hey this is a painted picture not a photo.
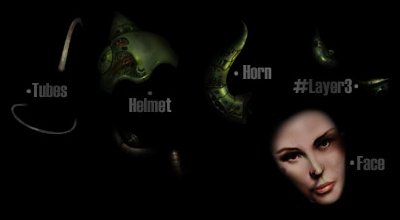
So, lets take a look at exploded view of layers, as you might find it useful how I configure it. Each, lets call it a material has its own layer. Point in doing that is when you want an overall change of one material (for instance those tubes) you just modify one layer, you don’t need to search thru layers seeking the corespondant part and then making the same procedure of changes all over again. So, its cool to name your layers (mine where: Background, Face, Horn, Layer 3 =), Helmet and Tubes).
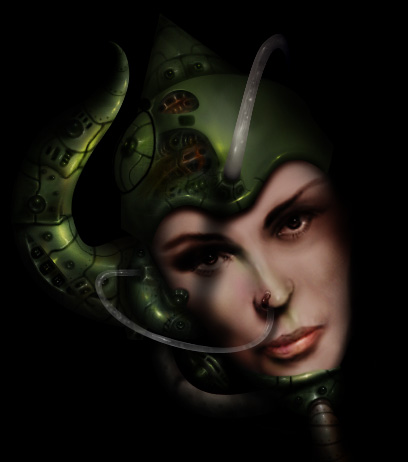
Aaaaaaand, here it is. Done, finished, beaten up. Looks nice, I like it. Boy I wish I could have that cool Wacom A4 tablet and a 21" monitor. Oh yeah, forgot to say I have 14” monitor that can only run 24bit color mode in 640x480. Man I suck. Ok, I hope you all enjoyed this little Photoshop walkthru, and you all learned your lessons. If you find this information valuable show it to someone else. That would please me =). So, I think this is enough for one time, maybe I’ll do another tutorial concerning, aah, dunno. Oh, don’t forget to e-mail me if you have some comments or something. Or specifically job proposition, that ones I don’t miss. Cheers.
Ps. This picture will probably end up as a teaser pic for the new upcoming RPG "SHADOWS of REALITY" by Nevolution software, or will later be used as a concept art.
Contact Der Punkt
Check out our Der Punkt gallery